Self-employed freelancers wear many hats; we’re the boss, employee, accountant, bookkeeper, customer service, project manager… the list goes on. We need a good organizational system to keep everything in check. MeisterTask is the one that works best for me, and I’m here to share how.

I love being organized. There’s something about sitting at my desk and knowing exactly what needs doing, where to do it and what steps to take first that makes life so much more peaceful. Especially since it wasn’t always this way.
In 2015, I made the switch from office life to a self-employed, freelance-writing life. While I was able to stay on top of things, I quickly learned that my organizational system of scattered post-it notes and various physical lists wasn’t going to cut it anymore. What worked in an office environment didn’t translate into the freelance writing environment.
This discovery led me down an organizational rabbit hole. I researched and tried project management apps and programs. For a while, I managed by using multiple different programs. But nothing really fit with my organizational style. That is, until I found MeisterTask.
MeisterTask combines the project management functions I love with to do lists, calendar syncs and so many other functions I hadn’t realized I needed. Now, I use MeisterTask literally every day and I’ve streamlined my process to increase productivity. In this article, I’m going to share with you how I do that.

My Week at a Glance
MeisterTask allows me to easily assess, at a glance, what’s going on during any given week. This means I can schedule appointments and meetings for “slow” days well in advance. That being said, there is one day every week that I really reap the organizational rewards… and that is Monday.
Mondays
Before MeisterTask, I used to spend a good chunk of each Monday going through various post-it notes, lists, organizational apps and project management apps to sort out the week’s work. This process took two to three hours. Now, I spend less than an hour reviewing my workload.
My Monday Morning Routine:
- Review the automation notifications.
- Check my iCalendar.
- Write my week’s work into my day planner to-do list.
- Assess my work load per day.
- Set the day’s tasks.
- Get to work.
The fourth step — assess — is essential. After nearly three years of working with this system, I know exactly how many task cards I can complete in a day. Mondays are the day I divvy up the tasks so that no single day is overloaded… and no single day is too light on work.
Daily
Every morning, I review my work load and add the day’s tasks, in order of priority, to the “My Checklist”. This gives me a quick reference throughout the day while I work, so I track my progress. Often times, my projects have multiple steps that take place over many days (sometimes weeks!), so even if I complete a task that day, the card remains to haunt me. The “My Checklist” function also allows me the supreme satisfaction of checking off a completed task, even if all I’m really doing is moving the card to the next “work on this” day.
Week’s End
I review any incomplete task cards and, if they aren’t urgent, move them to Monday. Sometimes, I’ll have to work over the weekend. Luckily, this happens less and less (proof that an efficient organizational system is very good for your health… and social life).
That’s what a typical organized week looks like for me. Time to dig into the nitty gritty of my MeisterTask setup.
Projects
Having all my projects listed on the MeisterTask dashboard means it’s easy to find specific assignments and task cards. Of course, it helps that I have organized everything in a way that makes sense to me.
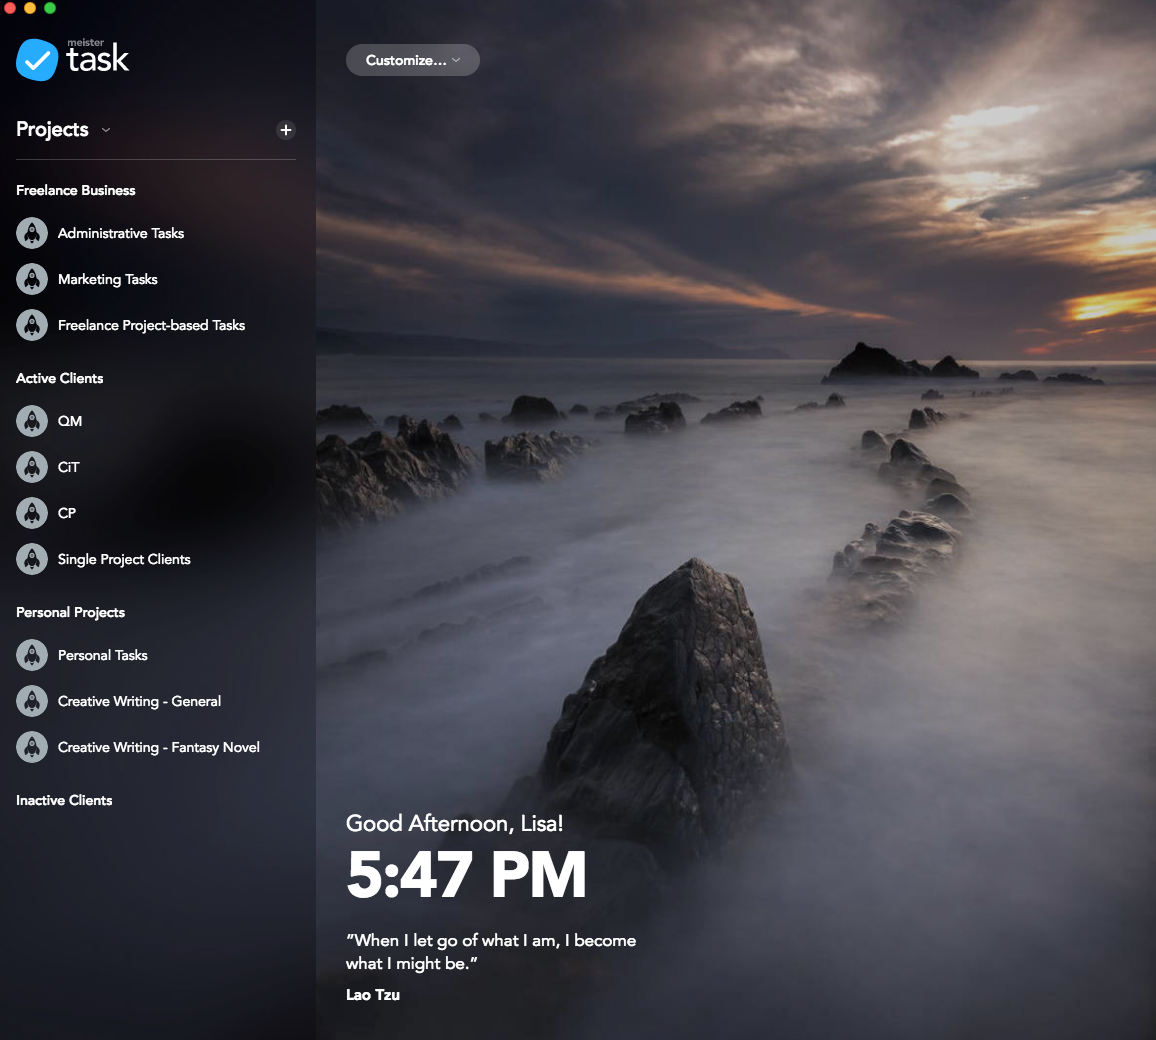
Project Groups
My projects are divided into four “Project Groups”: Freelance Business, Active Clients, Personal Projects, and Inactive Clients.
The Freelance Business group is where I keep my administrative and business operations projects. As it turns out, running your own at-home business requires a lot of different administrative and marketing tasks, like invoicing, social media posts, blogging, searching for new clients, keeping track of rates… and so much more. I put all these hats in this project group, so I never miss an important step.
The Active Clients project group is where I keep all my, you guessed it, active clients. Each client gets their own “project”, with the appropriate sections and task cards. When a client becomes inactive, but hasn’t yet closed their contract with me, I move them to my “Inactive Clients” group (I only archive a client when they close the contract). This way I keep all the organizational structure, without cluttering up my project list.
Finally, the “Personal Projects” group is where I keep all my, well, personal projects. I really do use MeisterTask to keep chaos out of all aspects of my life … I even planned my wedding with MeisterTask!
Workflow
In my experience, clients come in two types:
- Those with multiple repeat projects and assignments; and
- What I call “single project” clients, who have a single assignment for me at any given time.
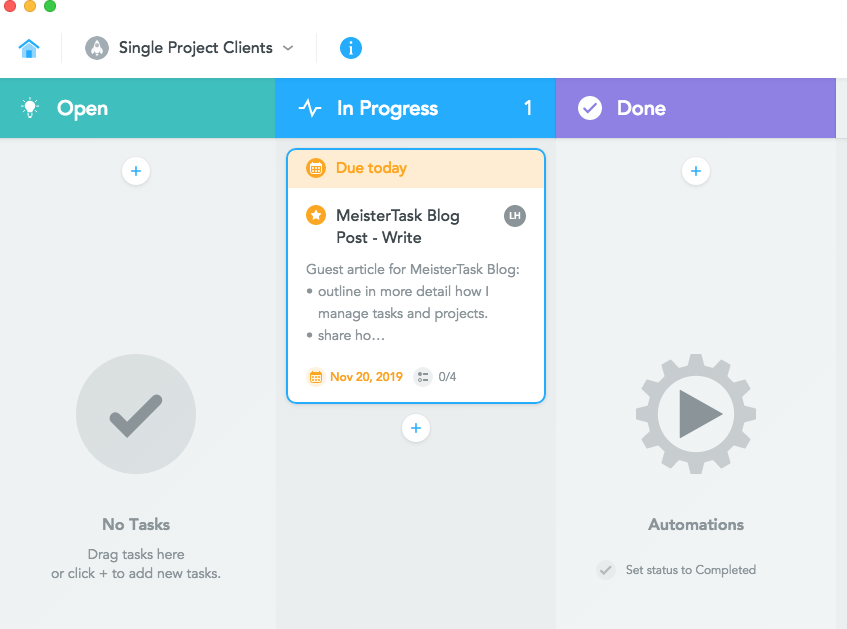
I use the pre-set MeisterTask workflow for “single project” clients. Once assigned, the task card goes in the “Open” section. Then I move it to “In Progress” while I’m working on it. When the client approves the work, I move it to “Done” (where it’s automatically marked complete).
My workflow is a bit different for “multi-project” clients. My clients CiT and QM often have multiple types of assignments across different departments and categories. For them, I label each section with the department/category name. CiT, for example, has two different locations. Their assignments are split into three categories: location A, location B and Corporate. So, I named my sections as follows:
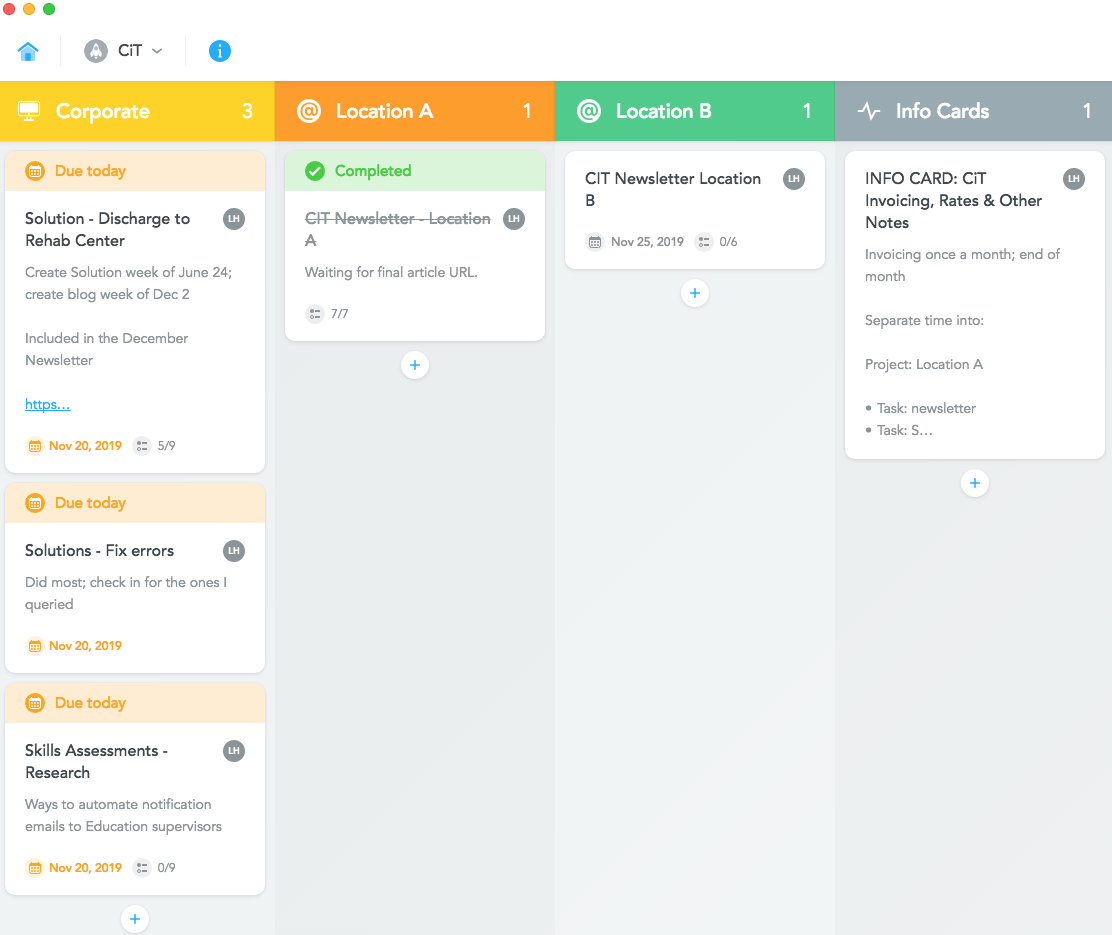
When an assignment comes in, I create a task card with all the notes and details, including the deadline and a “steps to complete” checklist. Then I set the “due date” (aka the day I will work on the assignment). I update the card as I complete the steps, only marking it complete when the whole assignment is done.
While CiT and QM are set up much the same way, there is one workflow difference. QM, which stands for Quench Magazine, has 11 sections to CiT’s four. Among the many projects are online articles — here’s the workflow for those:
- Create the task card in appropriate section.
- Work on project as per usual and submit.
- Move task card to my “Submitted” section, where it’s automatically marked “Complete”.
- Keep the card in that section, checking online for the article to appear.
- Archive once article is published.
This workflow easily tracks when the articles are published online and ensures that none of them are left as drafts.
Admittedly, my setup isn’t so much a “workFLOW” as a “cards turn orange on the day I plan to work on them” system. It works for me, though! Plus the task cards themselves record timestamps whenever changes are made, so if I ever need to know where I stand on a project, I can just read through the notes, comments and timestamps.
Checklists

I love checklists. No really. I’d make lists for everything if I could. I have a lot of different checklists — one for every recurring project I am assigned. MeisterTask’s multiple checklists feature allows me to save assignment-specific lists.
Since my workflow is set up in such a way that the “due date” on the card is the “day I’m going to work on the assignment”, that means that each new due date responds to a different item on my checklist.
For example, Product Reviews have five different steps:
- Request sample;
- Follow up;
- Receive sample;
- Write the review; and
- Prepare the article in the backend.
There is no way I can complete all of these in a single day. So I set the task card due date for the first step, then change the due date for each subsequent step.
Automations
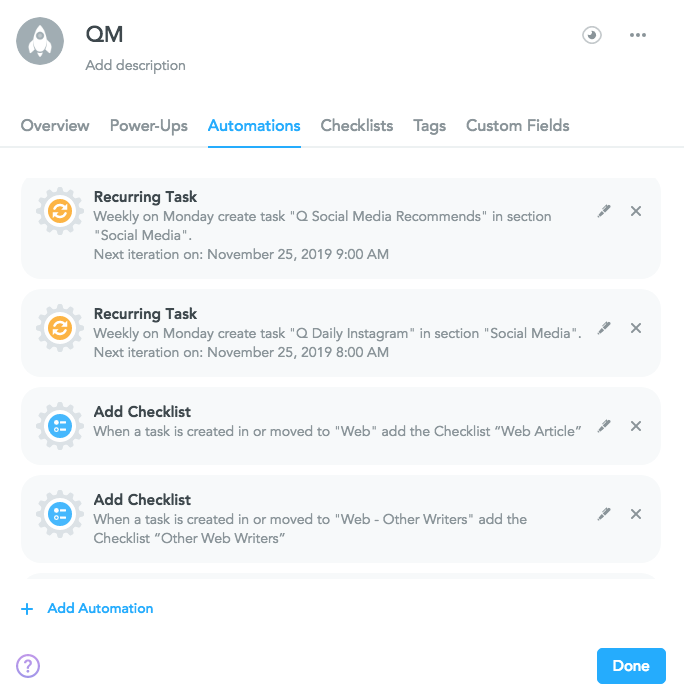
MeisterTask automations are a key time-saving function. While I have used MeisterTask’s multiple checklists feature since I first signed up, I am new to automations. I’m may not be using them to their fullest potential — I discover a new one almost daily. The two I very much love are “Recurring Task” and “Add Checklist”.
I have recurring tasks set to populate on Mondays, with the task cards pre-set with the due date. For example, QM has multiple weekly social media campaigns. Their task cards appear every Monday, with the due date set for later that week. I can then switch the day that I work on specific projects, based on my workload for that week.
Another automation I’ve come to appreciate is the “Set Status” automation. I use “Mark Complete” on QM’s “Submitted” section, and the “Done” section of Single Project Clients and CP.
Tasks
Creating a standard or template for how you keep track of content and create task cards goes a long way to keep your productivity levels high. So, now it’s time to get to the specific “card” features and how I use them.
In my mind, there are two types of tasks: one-time tasks and recurring tasks.
One-time Tasks
I create these cards the moment I receive the assignment. This allows me to record the details right away — including the due date — and add any stray thoughts I have when I’m not actively working on the project. Inspiration tends to strike at odd moments, so having the card ready means all my ideas are recorded no matter when I get them.
Recurring Tasks
As I mentioned above, I use the “Recurring Task” automation to make these. I did want to share how I used to manage recurring tasks before I had automations (it’s pretty basic). On the task’s checklist, I included a final step “Duplicate card”. When I completed the rest of the steps, I would then do that final step “duplicate the card”, mark the old one as complete and edit the new one to reflect the next week’s assignment. Easy peasy.
Now to break down the components of a card:
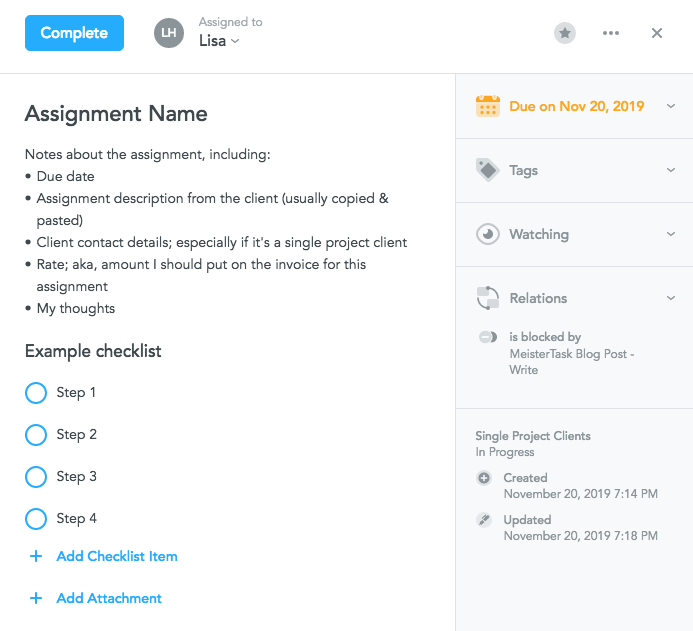
Assigned to: I work alone, so my name always appears here. When I was planning my wedding, I did assign some tasks to my sister, who was helping me. The only task cards that are different are non-action cards, like my Info Cards, which aren’t assigned to anyone.
Notes: This is where I put all the details – ie. deadline, contact details, etc. – I have when I first learn about the assignment. I also add details, thoughts and ideas here as I work on it.
Checklist: I have standard checklists for repeat assignment types; they each have specific steps and loading them to the appropriate task cards is easy.
Date/time: I set the date as the “work on it” day, rather than the due date. When I’m feeling especially disorganized, I will take a few minutes to set the “times” on my task cards, so that they appear in my iCalendar in a more coherent way. Usually I don’t get that specific, but sometimes it helps keep me from stressing out.
Tags: I used tags once upon a time… now I don’t. So I usually leave this empty.
Relations: When an assignment has more steps than I can manage in one task card, I divide it into parts. For example, this Guest Blog had a “Research” step, an “Outline” step, and a “Writing” step, each with “sub-steps”. I created a task card for each steps and added their “sub-steps” as checklists. Finally, I set the relations so that Research blocked Outline, which blocked Writing. This gave me a really great visual indicator of what needed to be done when I sat down to work on it.
Attachments: As someone who works alone, I don’t often have to use the attachments part of the card. That being said, I can see how useful this is for group work – collaborators can easily access the documents and links this way.
Comments: I use these a lot for my product reviews. When I test a product, I write my notes in the comments and then, when I write the article, I can easily copy-paste my notes into the draft.
Remember, you don’t have to set your cards up the way I have! It just has to be consistent across all your tasks. When everything appears the same way, in an easy-to-understand manner, you won’t waste time decoding your notes, or the assignment itself. You can open the task and get right to work.
Syncs & Perks
One benefit of being a self-employed freelance writer is the ability to work from literally anywhere with internet access. While I can manage without my organizational system — I did before! — MeisterTask’s apps mean I don’t have to. I have the mobile app on my phone and tablet, and I use the Mac app when I’m at my desk. This accessibility makes it very easier to jot down thoughts for projects as they come — so if I do have a middle-of-the-night, lightbulb moment, I don’t have to physically get up to write it down. I can just type it out on my phone, on the appropriate task, and it’ll be there for me in the morning.
Due Today List
There were two driving factors for my initial switch to MeisterTask way back in 2017. One was the “list by due date” function on the dashboard, where all task cards appeared in order of due date. (They introduced the “My Checklist” function later, and when they did I may or may not have squealed in excitement.) Previous project management apps I tried made me look at the task cards project by project, which meant I spent a lot of time combing through each client project page and finding the highlighted “due today” tasks.
Calendar Sync
The second driving factor for me was the Calendar sync. I have my iCal synced across all of my devices — desktop, phone, tablet — so having my tasks all appear in that app, where my personal events and family events are recorded, is … very convenient.
I do want to note that MeisterTask DOES have their own calendar function (found through the Statistics & Reports link). It only appears in a web browser though, so not as convenient when you’re on a device rather than a computer — but they don’t force me to use it, which is nice.
Files & Attachments
I have linked my MeisterTask account with Google Drive so I can attach the appropriate documents and easily find all my work. As I mentioned above, I don’t often attach files to my task cards. But when I do, I use the Google Drive integration.
Stay Organized; Be Productive
It’s been almost three years since I activated my MeisterTask account. This is, by far, the longest I’ve used any single program management or organizational platform. I’m always looking for ways to be more efficient, more organized… and MeisterTask allows me to do that. I do, and will continue to, recommend MeisterTask to anyone looking for an organizational app… with one piece of advice: always remember that “being organized” looks different to everyone.
My system, how I use MeisterTask, works really well for me. I hope that it has inspired you and given you some ideas of how to make the most of your MeisterTask account. If it hasn’t, that’s ok! You go out there, and find what works for you. Experiment, play around with the different functions, and make the most of the tools available, so you can live your most productive life.