At Meister, we take your requests seriously, and this is one we’ve heard from many MeisterTaskers: When can I see my projects in something like a Gantt chart? Finally, we can answer: Now!

Timeline provides you with the project overview you’ve been waiting for. You can now see all the tasks in a project displayed together, and even modify them directly. By doing this, you’ll be able to see how all the pieces fit together, and better coordinate tasks. Timeline is a big step towards our goal of helping you reach your goals.
Tell Me More
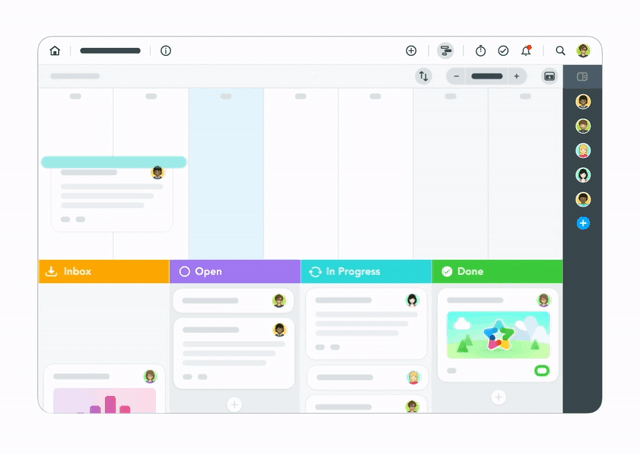
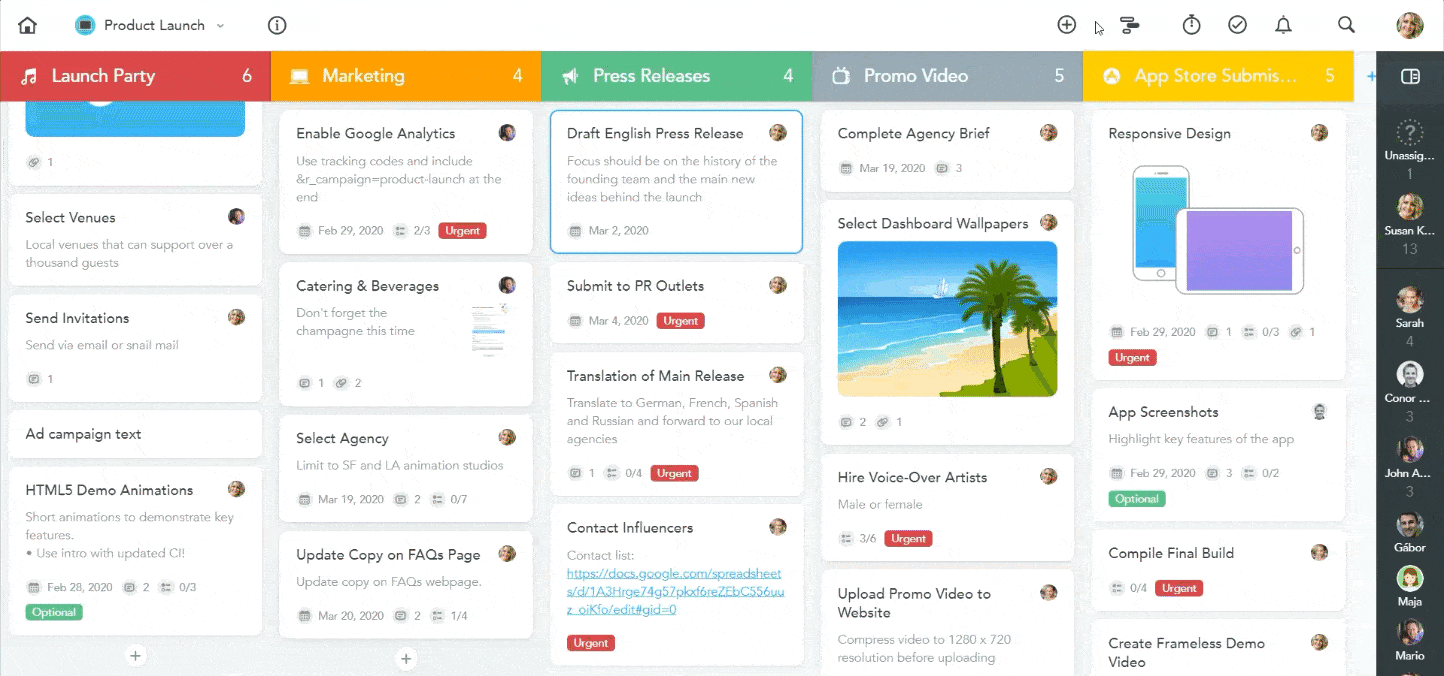
MeisterTask’s Timeline is similar in concept to a Gantt chart. That is to say, it’s a calendar with tasks overlaid. The Timeline shows the following information about tasks:
- the start and end date
- the assignee
- the location in the workflow (the color of a task reflects the section it is in)
If I were to describe all the advantages of viewing a project in this way, we would be here all day. Since time is on the line, I won’t do that. Ok, but maybe just a few:
Project overview
Kanban-style project boards are great for monitoring the progress of individual tasks and making sure they move steadily through the workflow. But for those who are interested in the broader scope of a project, the perspective that Timeline provides is essential. Once you see all the tasks in a project scheduled and color-coded in the same view, you might start to see them in a new light. You might realize that the priorities for the project have been set wrong; that certain tasks need to be done earlier or later; or even that certain tasks aren’t working towards the project goal and needn’t be done at all.
Resource management
Resource is a tricky word. So, here at Meister, we don’t have a Human Resources department, we have a People Team. Nonetheless, it’s common practice to use a view like Timeline to “manage your resources.” Because you can see who tasks are assigned to, and filter by assignee, tag, watcher, due date, and status, Timeline will help you to answer the questions:
- Is the work evenly distributed? Should it be?
- Are the team members doing what they’re best at, or what they enjoy doing?
- Does team member X have too many tasks in progress?
- Who can take over some of team member Y’s work while she’s away?
- How good are team members at approximating task duration?
- What is the average duration of task Z?
Deadline timing
One unavoidable part of project work is that tasks build on each other. Rarely is it the case that one person can see all tasks through to completion without the involvement of other team members or departments. The Timeline view will help you identify which tasks are related and which deadlines can’t be missed without significant repercussions. If you recognize that some time frames are too tight, it’s only a matter of adjusting the start and end dates on the Timeline. Hopefully, this will also help prevent bottlenecks.
Transparency and communication
If you think the Timeline view is only helpful for managers, think again. Sometimes it isn’t possible for me to catch exactly what everyone in my department is up to. That’s partly because I’m focused on my own work and partly because there are just so many moving pieces. Now that we’ve released Timeline internally at Meister, I can see what my teammates have planned to do with their time in the upcoming weeks and months. I’ve already decided to shift a few things around to better align with their schedules. With everything transparently displayed, and no need to open each task individually, I’m better able to coordinate with the other project members. Improved communication without direct communication; my introverted dream come true.
Time management and accountability
By aligning with my colleagues via their schedules on the Timeline, I’ve saved myself the situation of being finished with something before anyone is ready to take the next step with it. Or even worse, being caught flat-footed — unprepared when everyone else is ready to go. Seeing other team member’s tasks as they relate to my own, gives me a sense of accountability for my work. And as we all get used to scheduling our tasks, maybe my time management will improve. Only time(line) will tell.
Let the Planning Begin
To see the Timeline, click the new Timeline icon (![]()
- Drag and drop one or multiple, existing tasks from your project board
- Open an existing task and schedule a start and end date
- Double click on the Timeline and search for an existing task
- Double click on the Timeline and create a new task
- Create a new task and schedule a start and end date
The color of a task on the Timeline corresponds to the section the task is in. For example, if your In Progress section is red, all tasks In Progress will appear in red on your Timeline.
Once you’ve added tasks to your Timeline, drag the node at the beginning of a task to change its start date. Or drag the node at the end of a task to change the end date.
The end date of a task is independent of the due date. Why? Sometimes due dates serve as milestones between teammate handoffs. Each teammate may set his or her own due date while working on the task. And, we all know that not all tasks get finished by their due date. Depending on the task, you might want to provide a little buffer. We won’t tell.
If your tasks aren’t assigned to anyone, you can do that directly in the Timeline, too. Just click the question mark and search for an assignee.

Want a cleaner view? Click the arrow icon to sort the Timeline by space or start date.
Open the filter sidebar by clicking the icon in the top right, then mix and match the filters to change which tasks display on the Timeline and project board. Filter by tag, watcher, due date, status or scheduling.
You can still filter by assignee in the same way you always have; by clicking on a user’s icon in the right panel.
Got a lot of tasks to plan? Fullscreen the Timeline by clicking the down icon. Go back to split screen by clicking the up icon.
Zoom in and out to see a smaller or larger time frame, depending on how big a picture you’re trying to get. Do this by clicking the + and – on either side of Today. Or press Ctrl and scroll with the wheel on your mouse. On a touchpad or touchscreen, as usual, use two fingers to zoom.
Don’t Mind if I Do
Business and Enterprise users, now you’ve got the idea, have fun! Get all your ducks in a row, try out all the aspects and capabilities of this feature and let us know how you get on. You’ve been asking and waiting for this feature for quite some time, so we would love to hear your feedback — here or on Twitter @MeisterTask.
Need more information about Timeline? Please visit our support article.
